The State of The Windows App SDK
It’s spring time! Come and see Microsoft’s latest and greatest installment of the famous long-running series: Who Wants to Make The Best UI Framework! This article contains insights on things to pay attention to, and a quick tour for getting started for everyone interested in developing apps with the Windows App SDK.
History
Actually, the Windows App SDK traces back to the time of Windows 8 (again?).
Can you maybe talk about something other than Windows 8 please?
Woah, woah, hang on there. Of course there is way more stuff for me to talk about other than Windows 8. But just for the record, please allow me to finish this (at least I tried to make it so) brief history lesson.
For the full version to this brief excerpt, see A Rant About The Consistency of Windows. This chapter is more like a continuation of the chapter Project Reunion in the post.
If you are really on a busy day, skip to Getting started.
Do I really hate Windows 8?
Short version: I don’t hate Windows 8, period.
Long version: While the number of reasons for one to hate Windows 8 may be astronomical, credit where credit is due: it is still a great step forward for such a creaking grandma OS like Windows, in which lots of critical and fundamental changes (that nobody recognized) have been implemented under the hood to modernize the system, which also set the foundation for Windows 10’s success. I personally do not blame Microsoft for aggressive technological advancements (or catch-ups, to be honest). I even have a Windows 8.1 virtual machine as my sandbox for its lightness (compared with Windows 10) and snappiness, yet it is still a relatively modern Windows system that can run most applications just fine.
And hey, smileys! When your system unfortunately crashes again for that goddamn NVIDIA or AMD driver, certainly a :( face is way friendlier than a cryptic, white-text-on-blue screen right?
The TL;DR is that when Windows 8 was launched in 2012, along is the new, flat design language (formerly called Metro or Modern), whose UI framework was named as WinUI. Following the unfortunate trainwreck, Microsoft performed a major overhaul upon Windows’s visual design. The result of which is Windows 10, with a new design language that is now called Microsoft Design Language 2. And the name of the framework for this is? You guessed it right: WinUI 2.
But apparently, even with the launch of Windows 10, there are still plenty of apps that took advantage of neither WinUI nor WinUI 2. These are apps that draw their own interfaces in other ways, like old Win32 MFC, WinForms, WPF, Qt, GTK, Electron, etc. While others might be beyond Microsoft’s ability to intervene with, the first three are developed and maintained entirely by Microsoft. Thus looking at this mess, Microsoft planned to make something to unite all these scattered frameworks, something codenamed Project Reunion. The UI framework of which is officially called WinUI 3. And when Project Reunion reached its first 1.0 stable release, it was called the Windows App SDK, which suggests that it’s now the official Microsoft technology for building native apps on Windows. To summarize it all up:
| Windows version | Design language | UI framework |
|---|---|---|
| Windows 8 / 8.1 | MDL / “Metro” | WinUI |
| Windows 10 | MDL 2 / Fluent | WinUI 2 |
| Windows 11 | Fluent 2 | WinUI 3 |
Knowing the benefits and limitations
Bear in mind that the Windows App SDK can be seen as a spiritual successor to the Universal Windows Platforms (UWP). Thus many features and syntaxes in UWP development are passed along to Windows App SDK as well.
Like with UWP, when you are developing apps with the Windows App SDK, the most obvious benefit is having access to all modern Windows controls and their designs. You no longer have to worry about display scaling factors, light/dark mode detection, etc.
So what makes it different from UWP, other than its name? What are the benefits, limitations and caveats of using it? I’ll list a few points worth mentioning (not comprehensive):
Packaged and unpackaged
Before XAML Islands and Windows App SDK, the only way to use modern Windows controls (without some black magic wizardry) is to develop a “packaged” app, which is sandboxed, uses WinRT APIs and have no direct access to Win32 APIs, heck, even JITs are not allowed (hence the development of .NET Native). Those strict restrictions severely limited what developers can do: you either pick a fancy interface and have your arms and legs tied up, or pick an older interface and enjoy the freedom of ransacking through everywhere where UAC is absent. Although Microsoft did later allow traditional “desktop apps” to be packaged and avoid being sandboxed, accessing modern Windows controls and WinRT APIs is still a hurdle.
The Windows App SDK allows both packaged and unpackaged apps, meaning that unpackaged apps can easily access those APIs as well. Even if your app is packaged, you can opt out of sandboxing, effectively bypassing the limits on UWP apps.
Benefits
There are certainly benefits from migrating to such a new framework, here are some of the examples:
- (For .NET developers) Access to .NET features otherwise unavailable to UWP development
- Packaged and unpackaged option
- Access to all Win32 APIs via P/Invoke
- Access to WinRT APIs under
Windowsnamespace1 - Access to modern, native Windows controls
- Access to Windows materials (Acrylic and Mica)2
- Access to Chromium Edge-powered WebView2 control
- Automatic display scaling support
- Automatic system accent theming support
- Automatic light/dark mode support
- Automatic, responsive layout options
- UX stack decoupled from OS (Windows 11 style on Windows 10)
- Compile-time, powerful
{x:Bind}binding instead of runtime, reflection-based{Binding} - Implicit and connected animations
- Text rendering with DirectWrite
- Composition and animation with DirectX
Limitations
These are some of the features available in older frameworks but absent in the current version of Windows App SDK. You might want to take a look at these to see if those trade-offs are worth making the switch.
No UI preview in IDE
Available on: WinForms, WPF, UWP, Qt, or anything remotely modern.
This is the numer uno hurdle that is most annoying and has been troubling me the most. Familiar with WinForms or WPF development? Remember the Preview tab showing you what your product may look like? You like using Blend? Bam! Gone!
Some rants
Gee, Microsoft, you are a multi-trillion-dollar corporation, yet you didn’t even bother to implement such basic feature in your flagship product: the Visual Studio IDE. If making a UI preview does not earn you any extra money, then you should stop making WinUI 3 altogether, since apparently it does not earn you any extra money either, why not just, once again, put those R&D budget to Azure?
When Windows App SDK was released, I was shocked to see that there is not even a sign of a UI designer, not even preview. It is not even on the freaking roadmap. And apparently Microsoft’s idea is that “but you can use Hot Reload and Live Visual Tree!” So do not expect to have it in the near future.
More resources: GitHub discussion , Windows App SDK roadmap .
Missing windowing APIs
The ironic fact is that the Windows App SDK is lacking some windowing APIs available on older frameworks. Here are some of the stuff that you do not have control over out-of-the-box:
- Initial size, title and window icon
- Initial location (default / center of screen)
- Maximum and minimum height and width (both initial and runtime)
- Window resize mode
- Topmost state
- Can be maximized / minimized
- Programmatic maximization / minimization
In the early days of Windows App SDK, you don’t even have out-of-the-box control over window title.
Fortunately you can regain all these missing abilities with the amazing WinUIEx package. In case if you missed yet another ironic fact: even Microsoft’s own WinUI 3 template project is using it as a workaround for many missing features, including — that’s right: setting default window title.
No .NET Native
.NET Native is born to meet the restriction of UWP where no JIT is allowed during runtime. As its name implies, instead of the normal lifecycle of .NET, in which code files are compiled into the CIL intermediate format during compile time, and then dynamically interpreted and executed by JIT during runtime, the .NET Native toolchain compiles the emitted intermediate format straight into binary instructions that match target platform architecture. The result of which is vastly superior application performance and overall snappier user experience that rivals some of those written in C++3.
However in all these years, .NET Native seemed to be and remained exclusive to UWP development. It’s pity that no one can enjoy it when building anything that is not UWP. Thus you’ll lose that as well if you use the Windows App SDK for development.
No Xbox support
Your app built with the Windows App SDK, even if packaged as MSIX, cannot be installed or run on Xbox devices. Likewise, without explicit implementation, users on desktop cannot navigate in your app with the Xbox Controller like they could with UWP apps, either.
Too much boilerplate
This is technically not a limitation, but rather a design failure. It will not limit you from doing anything, but rather cripple your development flow.
Just the default template project created with Template Studio has more than 20 boilerplate files serving different purposes, and by default your app is based on Dependency Injection (a tough concept for many beginners). Plus, your solution is split into two projects: ProjectName and ProjectName.Core, for cross-platform portability reasons.

Hear me out: it is way too complicated for just a template, and can be overwhelming for even seasoned developers, let alone first-timers trying native Windows development. With each new project, developers have to waste hours examining the template and making necessary adjustments, before being able to do any practical development. There shouldn’t be this many boilerplates in a template project, and you shouldn’t have carved an entire application architecture for developers, either. This much code should be put somewhere else as a “reference project”, or be transformed into a tutorial for building applications with such design paradigm. A “template” should be as simple as which in Windows Forms and WPF, with only the bare minimum to get an application running, instead of functional.
Even worse, much of what the boilerplate files did is botches and patches for problems that shouldn’t have existed in the first place, and could have been integrated into the Windows App SDK ages ago. Those are framework-level problems, and there are tens of thousands of possible ways of fixing them available for choose, yet the one chosen by Microsoft is the stupidest among the stupidest: by including workarounds in every single template project, thus integrating them into all apps built with the SDK. This effectively planted bombs in every single app built with the Windows App SDK. And in the future, extra workarounds may be required for the workarounds implemented by those apps and now causing troubles, and this time you cannot simply fix them by changing templates. Templates are permanent, fixed at the start of development, and cannot be easily changed during lifetime like frameworks and dependencies are. Nobody wants the death spiral of workarounds, workarounds for workarounds, workarounds for workarounds for workarounds, etc.
Fortunately, you can start from scratch, relatively easily, actually. And that will be my recommended approach to developing with the Windows App SDK as well. Kinda like using Arch Linux or Gentoo, where you have full knowledgement of what you have now and what you’ve changed before, instead of other well-equipped distros that come with a graphical user interface by default.
But the unfortunate fact is that by going this way, you are now the one to write boilerplates to fix problems that should have been fixed by Microsoft. You must face the fact that there is no way around boilerplates when developing with the Windows App SDK, regardless if you choose to go with templates or start from scratch.
Getting started
If you’re happy to accept those challenges, let’s jump right in.
This tutorial is more for people with some C# and WPF development experience. If you have no previous experience, it may be really not for you.
Choosing tools
There really isn’t much to talk about the tool choices, as the number of available picks in the C# ecosystem is nowhere near Java.
Visual Studio
The most obvious is Microsoft’s own Visual Studio . You will need Visual Studio 2022 or later for development with the Windows App SDK. When installing, choose at least “.NET Desktop Development” workload and “Windows App SDK C# Templates” under optional components in the “Installation details” sidebar.
Template Studio
If you really want a wizard-based experience for creating project templates (that yourself may need an awful lot of time to comprehend) tailored to your needs. You can download the Template Studio plugin for Visual Studio here .
JetBrains Rider
The second is Rider by JetBrains. It offers powerful and comprehensive debugging tools like Predictive Debugger, and has great support for XAML development. Its auto-import and formatting is way more reliable than Visual Studio (for whatever reason auto-import breaks all the time and is nearly unusable on my Visual Studio installation), and IMHO, offers better overall experience for .NET development.
Rider has no full support for Windows App SDK projects
If you’ve decided to go with Rider, you should know that Rider has no full support for Windows App SDK projects yet. While regular code editing, autocompletion, code analysis are ok, debugging is borked (see RIDER-68942 for details), meaning that you may still need Visual Studio for complete development experience. This tutorial will focus on development flow with Visual Studio and may not cover Rider in all cases.
Creating the project
Deciding the scale of your project
Your project may be large: a fully-fledged CRM system with all kinds of bells and whistles, or small: a simple utility or widget with one focused goal. You need to pick different architectures for different kinds of projects with different purposes and requirements on scalability. This decides the template you choose.
Now that you have the required tools, you can create your first project. Depending on the scale of your project, you may either choose to start from an empty canvas (recommended) or with Template Studio to set up everything for you.
- To start with Template Studio: when creating the new project, search for “Template Studio for WinUI”, and follow instructions.
- To start from scratch: when creating the new project, search for “Blank app, packaged (WinUI 3 on Desktop)”.
Boilerplates
If you created your new project with Template Studio, then all required boilerplates are already in place.
If not, depending on the scale of your project, you may want to consider adding the following boilerplates. Those are not necessary for development, but might make your life a bit easier.
Basic setup
Here are some basic setup steps regardless of the scale of your application.
Restoring windowing APIs
To restore missing windowing functionalities, consider installing the WinUIEx package:
In your IDE, search for the WinUIEx package in NuGet Tool, or with command line:
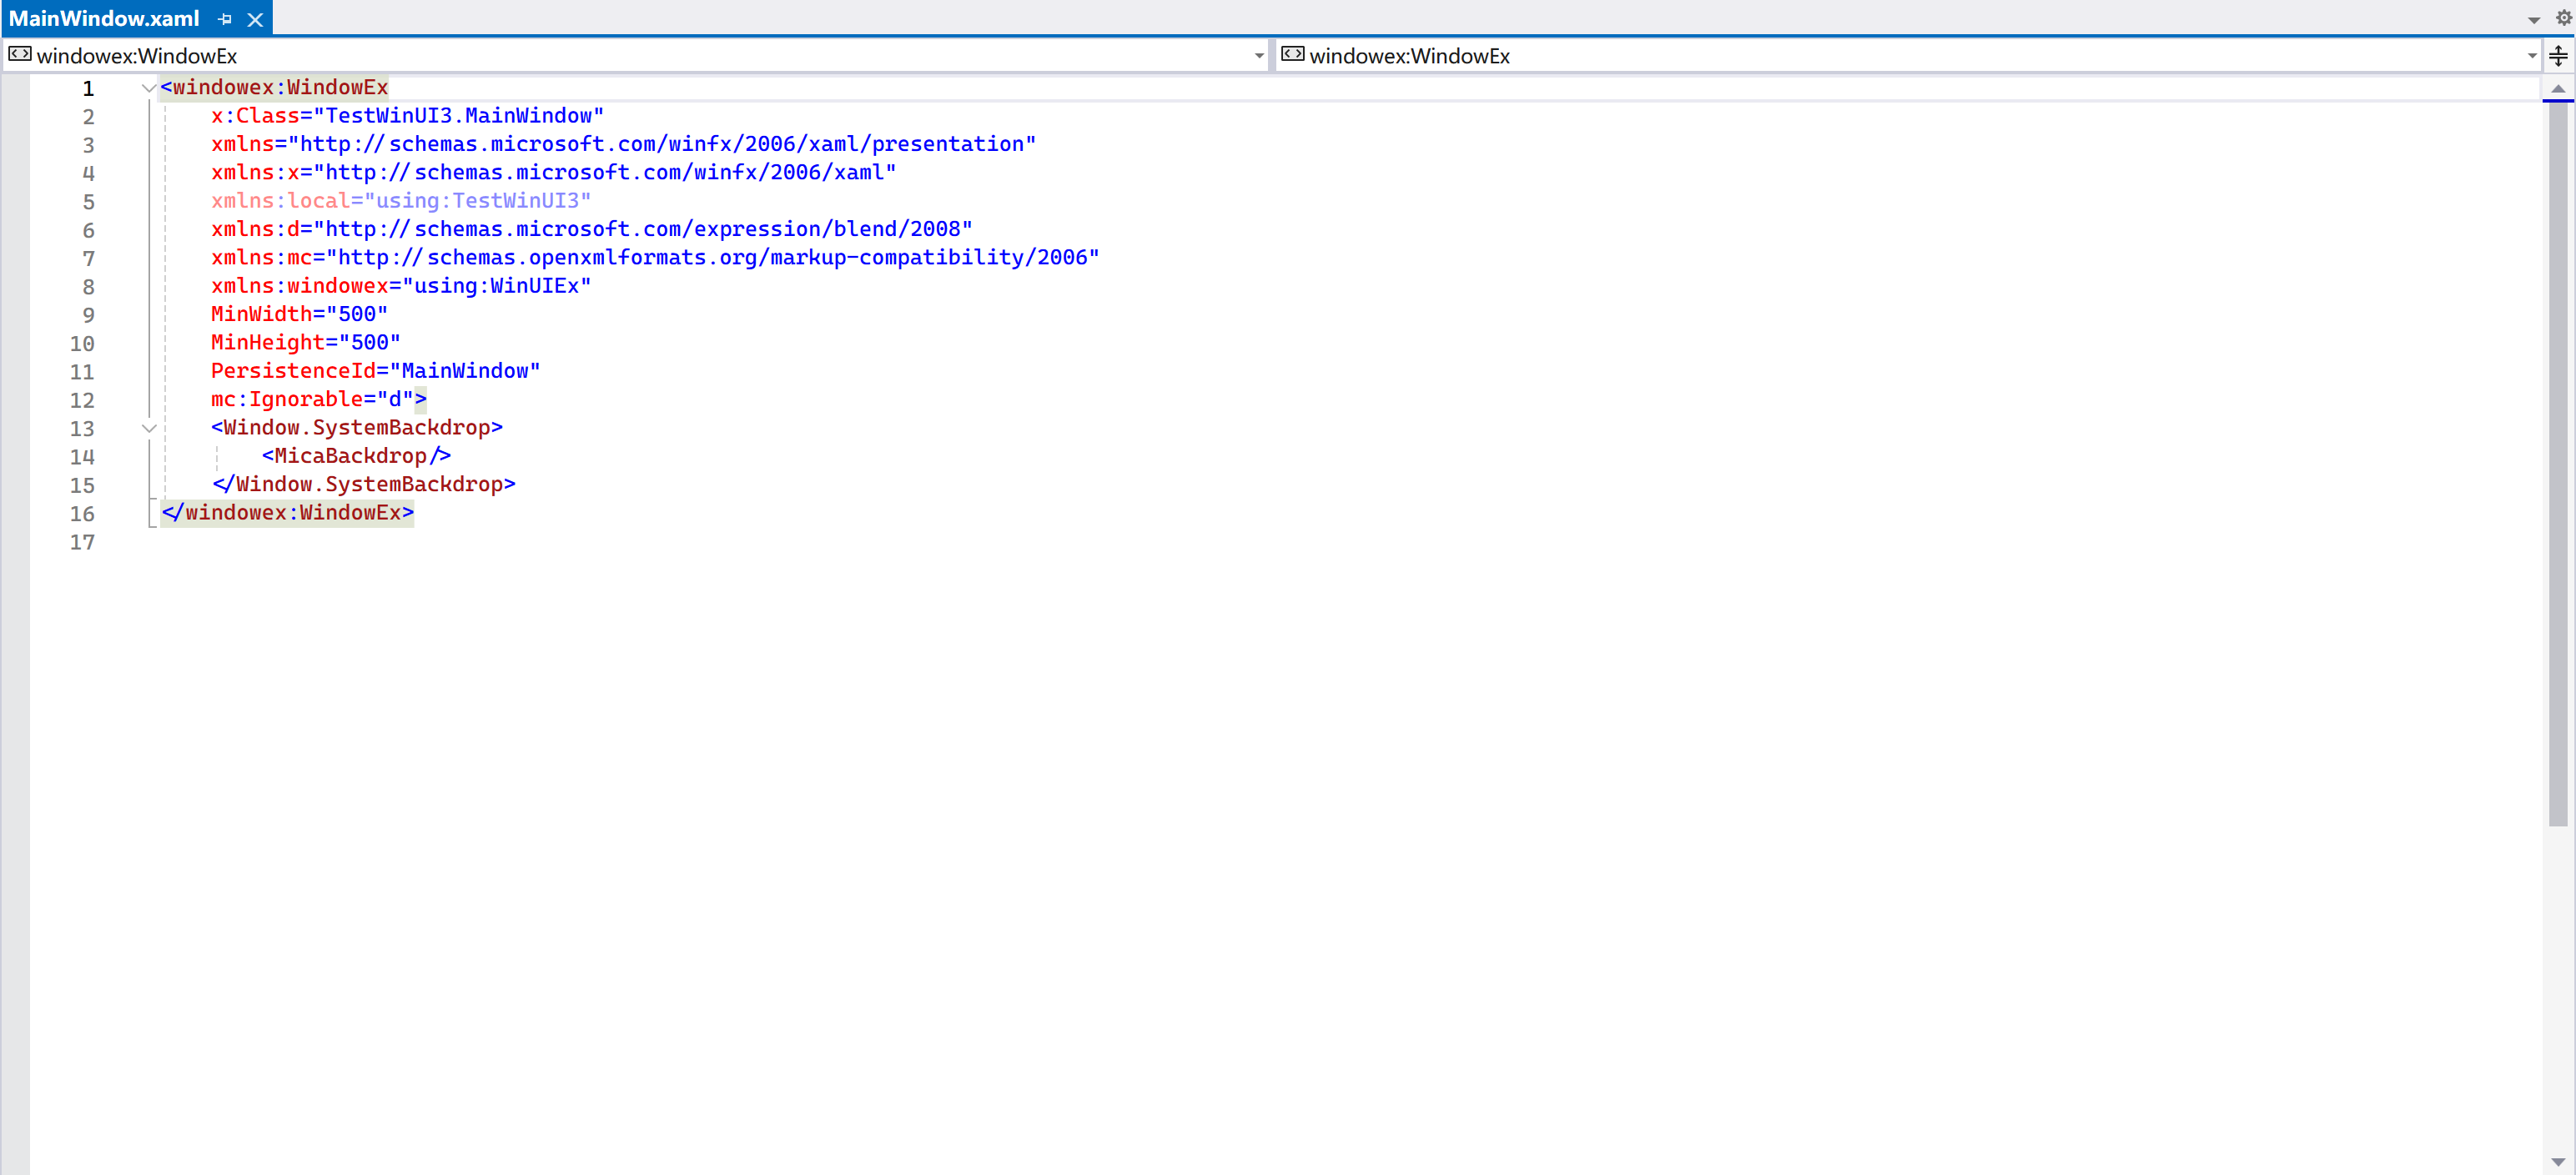
Then, change the base class of the windows in your application to WinUIEx.WindowEx by:
- In the
.xamlfile of your target window, addxmlns:winuiex="using:WinUIEx"to yourWindowelement, making it look like: - Change the base class of your
Windowelement towinuiex:WindowEx:<winuiex:WindowEx ... xmlns="http://schemas.microsoft.com/winfx/2006/xaml/presentation" xmlns:x="http://schemas.microsoft.com/winfx/2006/xaml" xmlns:d="http://schemas.microsoft.com/expression/blend/2008" xmlns:mc="http://schemas.openxmlformats.org/markup-compatibility/2006" xmlns:winuiex="using:WinUIEx" ... - In the
.xaml.csfile of the window, either just directly remove the base class annotation, and you’re done: This is acceptable because it is apartialclass. Or you can import the namespaceWinUIExand change the base class type toWinUIEx.WindowEx.
You can visit the project’s homepage for more information on its usage.
Setting up branding
As WinUI applications are now based on .NET, the recommended approach to changing the attributes and metadata of output assembly is no longer attributes in AssemblyInfo.cs, but rather manipulating values in the .csproj project file directly.
To set application icon:
- Create
Assetsfolder in your project if not present4. - Put your application icon (preferably both
.icoand.png) inside it. - Select the file(s) in Solution Explorer, make sure to have the following properties set:
- Build Action:
Content. - Copy to Output Directory:
Always.
- Build Action:
- Edit the
.csprojfile, add the following line: You can also group it with other metadata with aPropertyGrouplike:<PropertyGroup> <!-- File description --> <AssemblyTitle>Lorem ipsum Utility - The Lorem ipsum Generator</AssemblyTitle> <!-- Assembly name --> <Product>Lorem ipsum Utility</Product> <Copyright>Copyright © 2024, Contoso Inc.</Copyright> <Company>Contoso Inc.</Company> <!-- Icon of output .exe assembly --> <ApplicationIcon>Assets\Icon.ico</ApplicationIcon> </PropertyGroup> -
For every window that you want to set icon as such, add this line to your constructor:
You may need to import the following namespaces:Absolute path is required for the
AppWindow.SetIcon()APIUnfortunately
AppWindow.SetIcon()is just a P/Invoke wrapper for the underlying Win32 API and does not accept relative paths. Thus aPath.Combine()function call is required to get the absolute path to our icon file.If you specified an invalid path, no exceptions will be thrown to remind you that something has gone wrong, but you will see no icon in the Alt+Tab UI as a result.
With application icon set up, if you followed the steps above and created a PropertyGroup in your project file, simply modify those values to change other attributes.
Changing window title
If you have already installed the WinUIEx package with the steps above, you can simply change the Title property in XAML file to change window title (just like the good old days before with WPF).
If not, or you want to change window title programmatically, use (preferably in the constructor of your window):
Setting up system dialogs
Unfortunately you will need to perform the setups every single time you use any system dialog types (except ContentDialog, which is drawn by the app itself) like:
Windows.UI.Popups.MessageDialogWindows.Storage.Pickers.FileOpenPickerWindows.Storage.Pickers.FileSavePicker
Before calling the function to show the dialog, you will need to “initialize” it:
To call this function, you need to import the WinRT.Interop namespace.
Fortunately, once again, if you have installed the WinUIEx package, you can call the corresponding extension methods to create dialogs that are already initialized with the window:
var messageDialog = this.CreateMessageDialog(
    "The application has encountered a critical error and will be closing now.",
    "Critical Error");
var fileSaveDialog = this.CreateSaveFilePicker();
var fileOpenDialog = this.CreateOpenFilePicker();
Setting up ContentDialog
As of writing, for whatever reason, the default style of ContentDialog is not automatically applied, resulting in missing opening/entrance animation (it just pops open) and thus a bad, inconsistent user experience. See GitHub issue #5573 , #8476 for more information. This bug has been present since July 2021, and hasn’t been fixed for almost 3 years, requiring developers to use workarounds, while once again highlighting Microsoft’s commitment issue.
You will also need to specify the ContentDialog’s XamlRoot property to kind of “set which window it needs to be attached to”.
Fortunately you can fix this relatively simply by just two lines:
dialog.Style = Application.Current.Resources["DefaultContentDialogStyle"] as Style;
dialog.XamlRoot = Content.XamlRoot;
Or if you hate leaving hard-coded litter everythere, consider creating an extension method:
using Microsoft.UI.Xaml;
using Microsoft.UI.Xaml.Controls;

namespace MyAwesomeApp.Extensions;

public static class ContentDialogExtensions
{
    public static void ApplyFixesMicrosoftDidNotBotherTo(this ContentDialog contentDialog, Window baseWindow)
    {
        contentDialog.Style = Application.Current.Resources["DefaultContentDialogStyle"] as Style;
        contentDialog.XamlRoot = baseWindow.Content.XamlRoot;
    }
}
And later call it for every ContentDialog you create:
var updateDialog = new ContentDialog
{
    PrimaryButtonText = "OK",
    DefaultButton = ContentDialogButton.Primary,
    Title = "Friendly Alert",
    Content = "Hey, time to update your Windows!"
};
updateDialog.ApplyFixesMicrosoftDidNotBotherTo(this);

await updateDialog.ShowAsync();
Or even better, you can create an extension method that performs fixes and shows the dialog in one call:
public static Task<ContentDialogResult> ShowWithFixesAsync(this ContentDialog contentDialog, Window baseWindow)
{
    contentDialog.Style = Application.Current.Resources["DefaultContentDialogStyle"] as Style;
    contentDialog.XamlRoot = baseWindow.Content.XamlRoot;

    return contentDialog
        .ShowAsync()
        .AsTask();
}
Adding Mica and Acrylic material support
Acrylic is the default material in Windows 10 and Mica is the default material in Windows 11.
To use Acrylic as the base material for your app window, add the following lines to your XAML file under Window node:
Likewise, to use Mica:
For all pages displayed in the window, remember to clear the Background property if present.
But what if we want the app to use Mica where possible (Windows 11), and Acrylic as fallback? Luckily we can detect Windows version and programmatically set base material in window constructor:
// Set Mica or Acrylic backdrop according to system version
if (Environment.OSVersion.Version.Build >= 22000)
    SystemBackdrop = new MicaBackdrop();
else
    SystemBackdrop = new DesktopAcrylicBackdrop();
Detecting Windows 11
As of writing, Microsoft did not publish any official way to detect if current Windows version is Windows 11. The most reliable way seems to be checking build number: the initial release of Windows 11’s system version reads 10.0.22000.0, thus anything ≥ 22000 is Windows 11, and anything less than 22000 is Windows 10.
There is one caveat: to detect Windows version reliably without the system API triggering compatibility mode and returning 6.2.9200.0 (the version of Windows 8), you will need to explicitly declare that you support Windows 10 (and later) in your app.manifest file:
<compatibility xmlns="urn:schemas-microsoft-com:compatibility.v1">
  <application>
    <!-- The ID below informs the system that this application is compatible with OS features first introduced in Windows 10.
    It is necessary to support features in unpackaged applications, for example the custom titlebar implementation.
    For more info see https://docs.microsoft.com/windows/apps/windows-app-sdk/use-windows-app-sdk-run-time#declare-os-compatibility-in-your-application-manifest -->
    <supportedOS Id="{8e0f7a12-bfb3-4fe8-b9a5-48fd50a15a9a}" />
  </application>
</compatibility>
It should come shipped with any template of WinUI 3, including the Blank App one.
See the Stack Overflow discussion and confirmation from Microsoft employee on Microsoft Learn for more information.
Setting up data binding
Unfortunately there is still no built-in observable type for MVVM development in WinUI 3. There are two popular ways for you to choose:
- Developing your own base observable type
- Use MVVM Toolkit (recommended)
We will introduce the first one in this tutorial. For the latter one, check out its documentation.
First, create a base class:
using System.ComponentModel;
using System.Runtime.CompilerServices;

namespace MyAwesomeApp.ViewModels;

public class ObservableBase : INotifyPropertyChanged
{
    public event PropertyChangedEventHandler? PropertyChanged;

    protected void NotifyPropertyChanged([CallerMemberName] string propertyName = "")
        => PropertyChanged?.Invoke(this, new PropertyChangedEventArgs(propertyName));
}
Then, create the class for view model:
Then, for your view models, for every property, you will need a backing store for storing data and a property for triggering update events:
private string _versionString = string.Empty;

public string VersionString
{
    get => _versionString;
    set { _versionString = value; NotifyPropertyChanged(); }
}
For computed properties:
When changing the backing store value, you should notify changes of all potentially affected properties:
private string _versionString = string.Empty;

public string VersionString
{
    get => _versionString;
    set
    {
        _versionString = value;
        NotifyPropertyChanged();
        NotifyPropertyChanged(nameof(VersionStringLength));
    }
}

public int VersionStringLength => _versionString.Length;
Finally, in UI code, to bind to a value with {x:Bind}:
- Initialize view model object:
-
Bind to value in XAML:
Write properties properly!
Do NOT write something like:
As it’s equivalent to:
And creates new instances for every bind request. Thus all changes are effectively discarded, and your memory is stuffed with instances of view models.
Beware of bind mode difference from WPF
The default bind mode for
{x:Bind}in UWP and WinUI 3 is different from WPF, which usesTwoWayas the default value.{x:Bind}usesOneTimeas default value for performance reasons. You need to bear this in mind when developing WinUI 3 applications.There are two ways to control this behavior:
- Explicitly specify bind mode:
- Change default bind mode for the element and all children with
x:DefaultBindModeattribute :
Setting app as unpackaged
Sometimes you just want your app to run without being packaged. Plus, packaged apps require valid digital signatures to be installable on other devices, making it troublesome for private distribution. If you want your app to be unpackged, do the following steps:
- In your project file, add:
- On your IDE, select run target to
ProjectName (Unpackaged).
And you should now be able to run and distribute your app just like the old days. By default your app does not ship the Windows App SDK version required for your app to run (meaning that users must have Windows App SDK installed on their systems to be able to run your app), you can add this line to your project file to include it with your app:
Setup for navigational app
If you wants your application to use the standard navigational design paradigm, you may need additional setups to get started. We do not use Dependency Injection in this tutorial, despite its elegance and benefit for future maintainability, as it may get too overwhelming for many readers.
Boilerplate resources
By default, if you use a NavigationView control directly, you will see margins being incorrect and alignments being off. This is because somehow Microsoft still didn’t manage to embed some required resources into the framework itself. So they decided that as a developer, it’s your job to put those in your app. Here are some lines freshly ripped off the template project created with Template Studio:
- Create a folder in your project named
Styles. - In your
App.xaml, add the highlighted lines:App.xaml<ResourceDictionary.MergedDictionaries> <XamlControlsResources xmlns="using:Microsoft.UI.Xaml.Controls" /> <!-- Other merged dictionaries here --> <ResourceDictionary Source="/Styles/FontSizes.xaml" /> <ResourceDictionary Source="/Styles/Thickness.xaml" /> <ResourceDictionary Source="/Styles/TextBlock.xaml" /> </ResourceDictionary.MergedDictionaries> -
Create the style files:
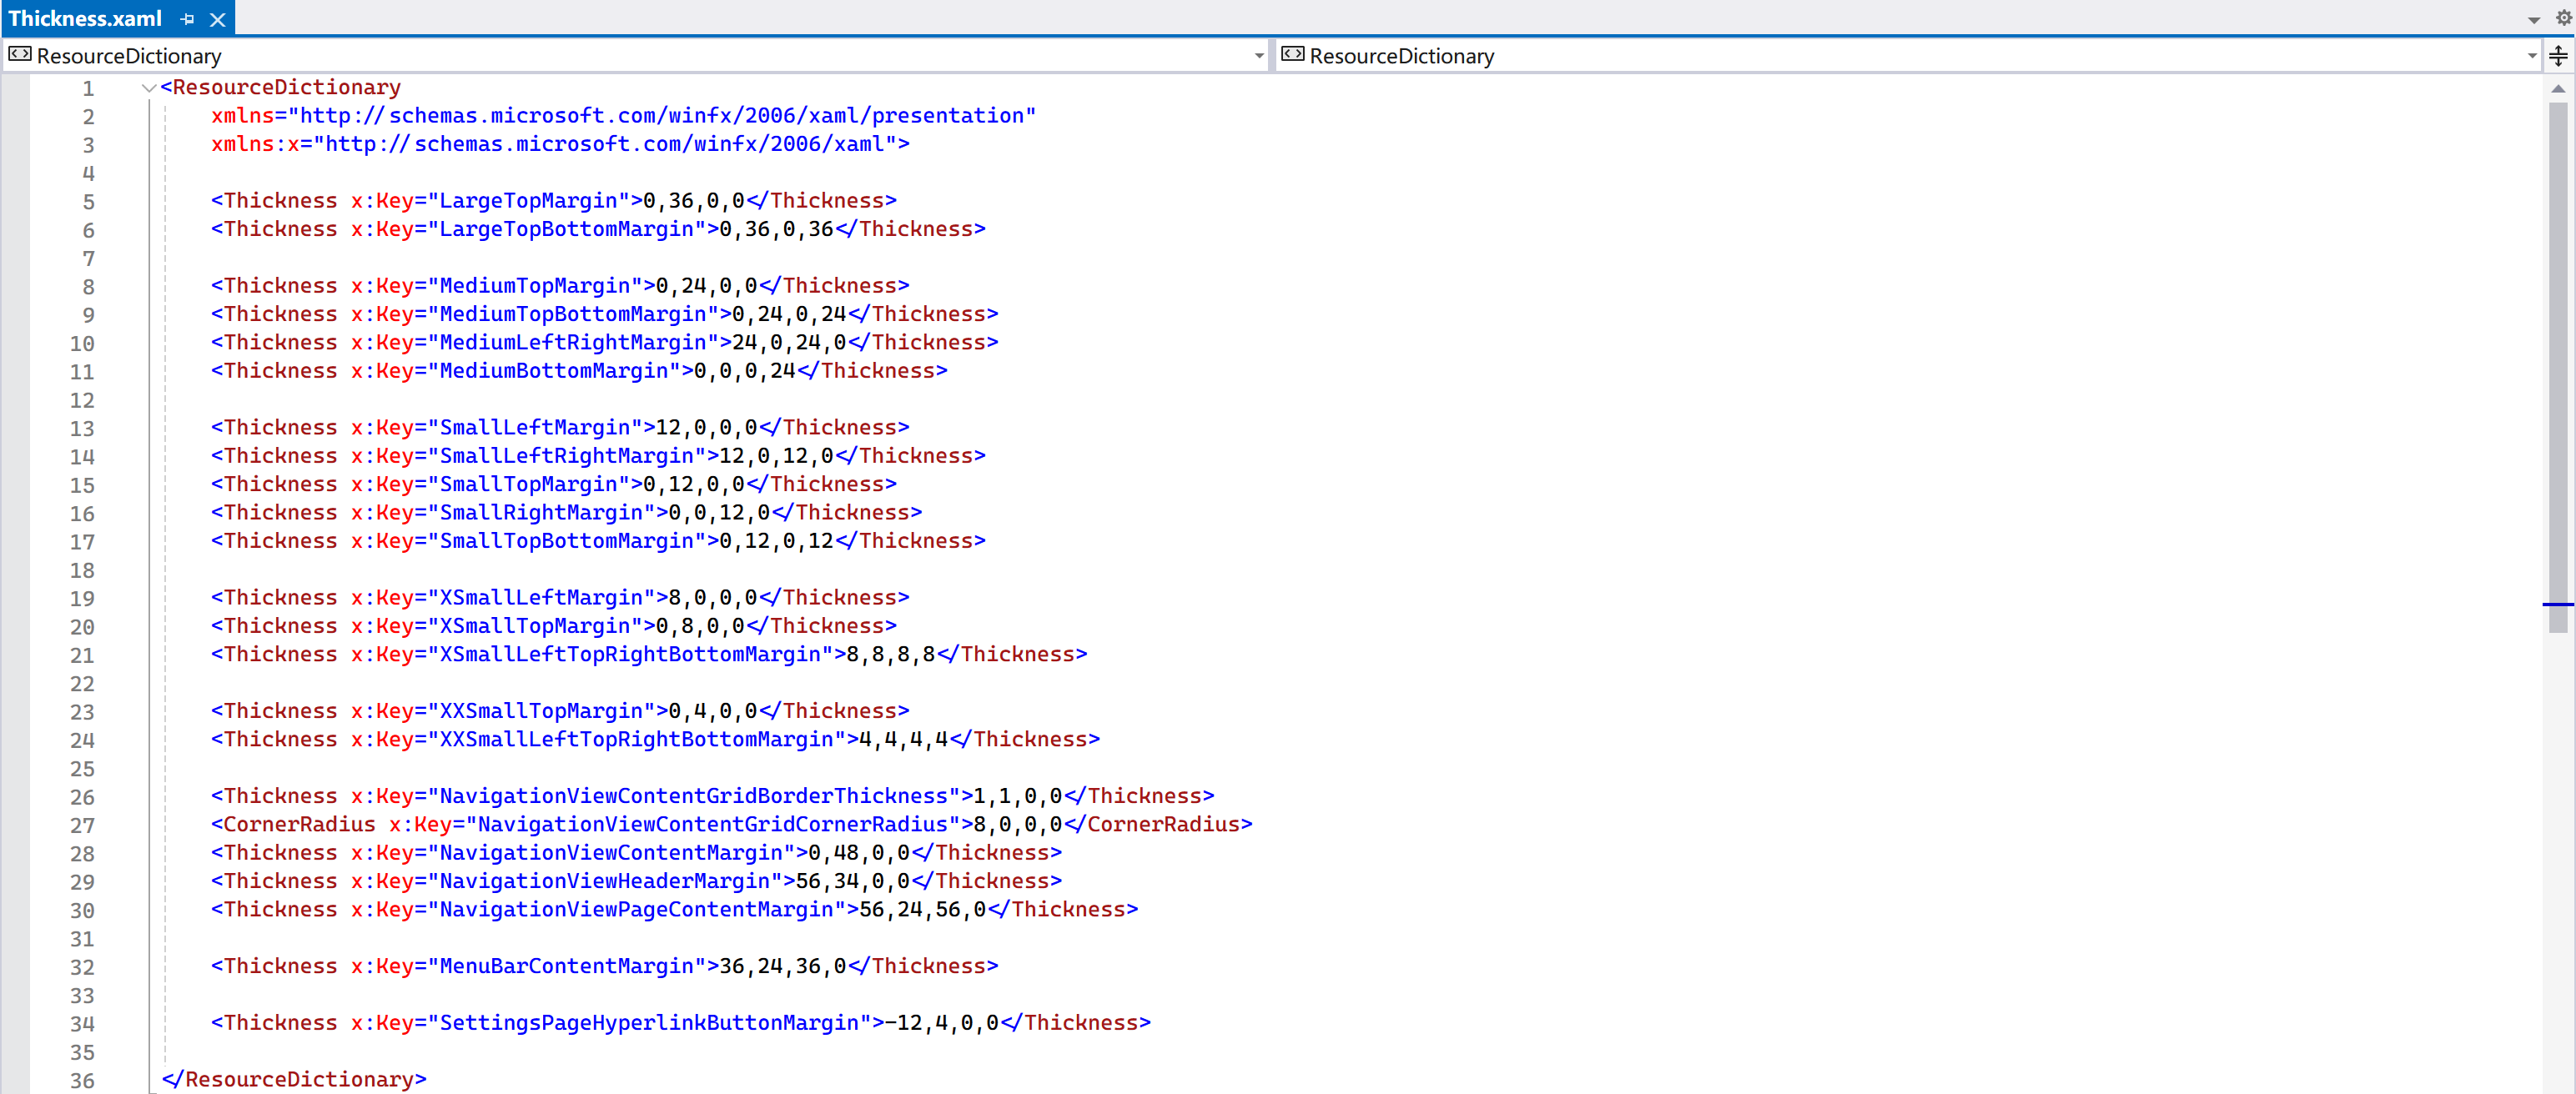
/Styles/FontSizes.xamlServing
/Styles/TextBlock.xaml, can be removed with it altogether./Styles/Thickness.xaml<ResourceDictionary xmlns="http://schemas.microsoft.com/winfx/2006/xaml/presentation" xmlns:x="http://schemas.microsoft.com/winfx/2006/xaml"> <Thickness x:Key="LargeTopMargin">0,36,0,0</Thickness> <Thickness x:Key="LargeTopBottomMargin">0,36,0,36</Thickness> <Thickness x:Key="MediumTopMargin">0,24,0,0</Thickness> <Thickness x:Key="MediumTopBottomMargin">0,24,0,24</Thickness> <Thickness x:Key="MediumLeftRightMargin">24,0,24,0</Thickness> <Thickness x:Key="MediumBottomMargin">0,0,0,24</Thickness> <Thickness x:Key="SmallLeftMargin">12,0,0,0</Thickness> <Thickness x:Key="SmallLeftRightMargin">12,0,12,0</Thickness> <Thickness x:Key="SmallTopMargin">0,12,0,0</Thickness> <Thickness x:Key="SmallRightMargin">0,0,12,0</Thickness> <Thickness x:Key="SmallTopBottomMargin">0,12,0,12</Thickness> <Thickness x:Key="XSmallLeftMargin">8,0,0,0</Thickness> <Thickness x:Key="XSmallTopMargin">0,8,0,0</Thickness> <Thickness x:Key="XSmallLeftTopRightBottomMargin">8,8,8,8</Thickness> <Thickness x:Key="XXSmallTopMargin">0,4,0,0</Thickness> <Thickness x:Key="XXSmallLeftTopRightBottomMargin">4,4,4,4</Thickness> <Thickness x:Key="NavigationViewContentGridBorderThickness">1,1,0,0</Thickness> <CornerRadius x:Key="NavigationViewContentGridCornerRadius">8,0,0,0</CornerRadius> <Thickness x:Key="NavigationViewContentMargin">0,48,0,0</Thickness> <Thickness x:Key="NavigationViewHeaderMargin">56,34,0,0</Thickness> <Thickness x:Key="NavigationViewPageContentMargin">56,24,56,0</Thickness> <Thickness x:Key="MenuBarContentMargin">36,24,36,0</Thickness> <Thickness x:Key="SettingsPageHyperlinkButtonMargin">-12,4,0,0</Thickness> </ResourceDictionary>/Styles/TextBlock.xamlAdditional pre-defined styles for
TextBlockcontrol, requires/Styles/FontSizes.xaml.<ResourceDictionary xmlns="http://schemas.microsoft.com/winfx/2006/xaml/presentation" xmlns:x="http://schemas.microsoft.com/winfx/2006/xaml"> <Style x:Key="PageTitleStyle" TargetType="TextBlock"> <Setter Property="VerticalAlignment" Value="Center" /> <Setter Property="FontWeight" Value="SemiLight" /> <Setter Property="FontSize" Value="{StaticResource LargeFontSize}" /> <Setter Property="TextTrimming" Value="CharacterEllipsis" /> <Setter Property="TextWrapping" Value="NoWrap" /> </Style> <Style x:Key="BodyTextStyle" TargetType="TextBlock"> <Setter Property="FontWeight" Value="Normal" /> <Setter Property="FontSize" Value="{StaticResource MediumFontSize}" /> <Setter Property="TextTrimming" Value="CharacterEllipsis" /> <Setter Property="TextWrapping" Value="Wrap" /> </Style> </ResourceDictionary>
Main window
Remove everything in the Window node, making it something like this:
<?xml version="1.0" encoding="utf-8"?>
<winuiex:WindowEx
    x:Class="MyAwesomeApp.MainWindow"
    xmlns="http://schemas.microsoft.com/winfx/2006/xaml/presentation"
    xmlns:x="http://schemas.microsoft.com/winfx/2006/xaml"
    xmlns:local="using:MyAwesomeApp"
    xmlns:d="http://schemas.microsoft.com/expression/blend/2008"
    xmlns:mc="http://schemas.openxmlformats.org/markup-compatibility/2006"
    xmlns:winuiex="using:WinUIEx"
    mc:Ignorable="d">

</winuiex:WindowEx>
The goal is to have a visual tree like this:
- Root (Window /
DesktopWindowXamlSource)- Root content grid (
Grid)- Custom title bar (
Grid) - Navigation view (
NavigationView)- Navigation items (
NavigationViewItem) - Content frame (
Frame)- Actual page contents (
Page)
- Actual page contents (
- Navigation items (
- Custom title bar (
- Root content grid (
To construct a scaffolding of this structure, let’s go step by step:
- Add root content grid:
<?xml version="1.0" encoding="utf-8"?> <winuiex:WindowEx x:Class="MyAwesomeApp.MainWindow" xmlns="http://schemas.microsoft.com/winfx/2006/xaml/presentation" xmlns:x="http://schemas.microsoft.com/winfx/2006/xaml" xmlns:local="using:MyAwesomeApp" xmlns:d="http://schemas.microsoft.com/expression/blend/2008" xmlns:mc="http://schemas.openxmlformats.org/markup-compatibility/2006" xmlns:winuiex="using:WinUIEx" mc:Ignorable="d"> <Grid> <Grid.BackgroundTransition> <!-- Add implicit background transition to seamlessly transition between light and dark mode --> <BrushTransition/> </Grid.BackgroundTransition> </Grid> </winuiex:WindowEx> - Add customized title bar:
<?xml version="1.0" encoding="utf-8"?> <winuiex:WindowEx x:Class="MyAwesomeApp.MainWindow" xmlns="http://schemas.microsoft.com/winfx/2006/xaml/presentation" xmlns:x="http://schemas.microsoft.com/winfx/2006/xaml" xmlns:local="using:MyAwesomeApp" xmlns:d="http://schemas.microsoft.com/expression/blend/2008" xmlns:mc="http://schemas.openxmlformats.org/markup-compatibility/2006" xmlns:winuiex="using:WinUIEx" mc:Ignorable="d"> <Grid> <Grid.BackgroundTransition> <!-- Add implicit background transition to seamlessly transition between light and dark mode --> <BrushTransition/> </Grid.BackgroundTransition> <Grid x:Name="AppTitleBar" Canvas.ZIndex="1" Height="{x:Bind NavigationView.CompactPaneLength, Mode=OneWay}" IsHitTestVisible="True" VerticalAlignment="Top" Padding="0,0,140,0"> <!-- Give way to window controls (minimize / maximize / close) --> <Image Source="/Assets/Icon.ico" HorizontalAlignment="Left" VerticalAlignment="Center" Width="16" Height="16"/> <TextBlock x:Name="AppTitleBarText" HorizontalAlignment="Left" VerticalAlignment="Center" TextWrapping="Wrap" MaxLines="2" Margin="28,0,0,0" TextTrimming="CharacterEllipsis" Style="{StaticResource CaptionTextBlockStyle}"> My Awesome App </TextBlock> </Grid> </Grid> </winuiex:WindowEx> - From code-behind, set custom title bar for the window in the constructor:
- Add navigation view:
By default we have one navigation item (Home), you can add more later on.
<?xml version="1.0" encoding="utf-8"?> <winuiex:WindowEx x:Class="MyAwesomeApp.MainWindow" xmlns="http://schemas.microsoft.com/winfx/2006/xaml/presentation" xmlns:x="http://schemas.microsoft.com/winfx/2006/xaml" xmlns:local="using:MyAwesomeApp" xmlns:d="http://schemas.microsoft.com/expression/blend/2008" xmlns:mc="http://schemas.openxmlformats.org/markup-compatibility/2006" xmlns:winuiex="using:WinUIEx" mc:Ignorable="d"> <Grid> <Grid.BackgroundTransition> <!-- Add implicit background transition to seamlessly transition between light and dark mode --> <BrushTransition/> </Grid.BackgroundTransition> <Grid x:Name="AppTitleBar" Canvas.ZIndex="1" Height="{x:Bind NavigationView.CompactPaneLength, Mode=OneWay}" IsHitTestVisible="True" VerticalAlignment="Top" Padding="0,0,140,0"> <!-- Give way to window controls (minimize / maximize / close) --> <Image Source="/Assets/Icon.ico" HorizontalAlignment="Left" VerticalAlignment="Center" Width="16" Height="16"/> <TextBlock x:Name="AppTitleBarText" HorizontalAlignment="Left" VerticalAlignment="Center" TextWrapping="Wrap" MaxLines="2" Margin="28,0,0,0" TextTrimming="CharacterEllipsis" Style="{StaticResource CaptionTextBlockStyle}"> My Awesome App </TextBlock> </Grid> <NavigationView x:Name="NavigationView" Canvas.ZIndex="0" OpenPaneLength="200" IsBackButtonVisible="Visible" IsBackEnabled="{x:Bind ContentFrame.CanGoBack, Mode=OneWay}" IsSettingsVisible="True" BackRequested="NavigationView_BackRequested" DisplayModeChanged="NavigationView_DisplayModeChanged" ItemInvoked="NavigationView_ItemInvoked" PointerPressed="NavigationView_PointerPressed" ProcessKeyboardAccelerators="NavigationView_ProcessKeyboardAccelerators"> <NavigationView.MenuItems> <NavigationViewItem Icon="Home" Tag="HomePage" Content="Home"/> </NavigationView.MenuItems> <Frame x:Name="ContentFrame" x:FieldModifier="Public" Navigated="ContentFrame_Navigated"/> </NavigationView> </Grid> </winuiex:WindowEx> - Create Home page and Settings page:
- Create a folder in your project named
Pages. - Right click
Pages, add item type ofBlank Page (WinUI 3), name it asHomePage. - Do the same above for
SettingsPage, you will need the name to be exact to match the template code below.
- Create a folder in your project named
- Configure initial navigation in constructor:
- Wire up events (remember to import
MyAwesomeApp.Pagesnamespace!):private void NavigationView_BackRequested(NavigationView sender, NavigationViewBackRequestedEventArgs args) { if (ContentFrame.CanGoBack) ContentFrame.GoBack(); } private void NavigationView_DisplayModeChanged(NavigationView sender, NavigationViewDisplayModeChangedEventArgs args) { // Adapt to layout changes as the burger menu now lives on the title bar AppTitleBar.Margin = new Thickness() { Left = sender.CompactPaneLength * (sender.DisplayMode == NavigationViewDisplayMode.Minimal ? 2 : 1), Top = AppTitleBar.Margin.Top, Right = AppTitleBar.Margin.Right, Bottom = AppTitleBar.Margin.Bottom }; } private void NavigationView_ItemInvoked(NavigationView sender, NavigationViewItemInvokedEventArgs args) { // Special detection for Settings page if (args.IsSettingsInvoked && ContentFrame.SourcePageType.Name == "SettingsPage") return; else if (ContentFrame.SourcePageType.Name == ((NavigationViewItem)args.InvokedItemContainer).Tag.ToString()) return; Type? targetType; if (args.IsSettingsInvoked) targetType = typeof(SettingsPage); else targetType = (args.InvokedItemContainer as NavigationViewItem)?.Tag switch { // Add references to pages here if you have added more pages in the future nameof(HomePage) => typeof(HomePage), _ => null }; if (targetType is not null) ContentFrame.Navigate(targetType, null, args.RecommendedNavigationTransitionInfo); } private void ContentFrame_Navigated(object sender, NavigationEventArgs e) { // Automatically decide which navigation item should be selected if (e.SourcePageType == typeof(SettingsPage)) NavigationView.SelectedItem = NavigationView.SettingsItem; else if (ContentFrame.SourcePageType != null) { var targetItem = NavigationView.MenuItems .OfType<NavigationViewItem>() .FirstOrDefault(i => i.Tag.Equals(ContentFrame.SourcePageType.Name)); if (targetItem is not null) NavigationView.SelectedItem = targetItem; } } // Handle keyboard return shortcuts private void NavigationView_ProcessKeyboardAccelerators(UIElement sender, ProcessKeyboardAcceleratorEventArgs args) { if (args.Modifiers == VirtualKeyModifiers.Menu && args.Key == VirtualKey.Left || args.Key == VirtualKey.GoBack || args.Key == VirtualKey.XButton1) { if (ContentFrame.CanGoBack) { ContentFrame.GoBack(); args.Handled = true; } } } // Handle mouse back button private void NavigationView_PointerPressed(object sender, PointerRoutedEventArgs e) { if (e.GetCurrentPoint(NavigationView).Properties.IsXButton1Pressed && ContentFrame.CanGoBack) { ContentFrame.GoBack(); e.Handled = true; } }
Congratulations! You should now have a working navigational app that looked like this:

You can also save your project now as a template for all future projects.
Onwards!
Now that your project is set up, you can carry on with your normal development procedure.
So to answer the question: what’s the state of the Windows App SDK? I’ll probably say: it’s usable, but still flawed, with many easily fixable bugs overdue for a long time. Every project needs tons of setup work, fixes and hacks by developers, and can cause further problems in the future.
Be sure to regularly check for release notes of the Windows App SDK to see if your hacks for some problems are finally fixed and can be removed. Chances are that Microsoft may not even dare to fix those problems when they finally have the time to do so, as fixes may break the workarounds, causing new problems by fixing old problems.
This is the commitment issue. Despite the great concepts, Microsoft showed little commitment on this project, and had assigned very few resources for it. Think twice before you make this investment, as the future of the Windows App SDK is very much unclear, and your hard work could be in tatters in no time. Stick to older frameworks like Windows Forms and WPF if you are hesitant making the move. Microsoft’s track record has clearly shown that they may torch this or that, they never had the bravery of torching those old working horses. Thus while you may not have access to the latest and greatest features, at least you are not at the risk of suddenly losing all investments, if you’re not making any investment at all.
-
Some may require your app to be packaged (to have a Package Identity ) to work. ↩
-
Acrylic and Mica material support was added in a later release. ↩
-
Maybe everyone knew that even if your application is compiled into native binary, its performance is still nowhere near those written in C++ as there are still overheads from the framework and runtime. However this is not true in all scenarios. Take sorting algorithms for example, a badly written algorithm in C++ may perform way worse than .NET’s built-in, highly optimized
IEnumerable.Sort()algorithm implementation, let alone the binary version compiled with .NET Native. I am fully aware of the fact that STL has a built-in, highly optimized sorting algorithm as well, but this is not the point of this discussion. ↩ -
Can be any arbitrary path, but
Assetsis the standard and recommended name. ↩